
What if sanding every surface isn’t the safest path to a lasting paint finish? Professional surface preparation painting means matching each step to the surface and its condition, not following the same checklist everywhere. Dirt, loose paint, stains, and surface flaws each call for a different response.
If you’re unsure whether to clean, scrape, sand, or prime, start by inspecting the material and existing coating. Skipping a needed step can leave paint vulnerable to peeling or uneven coverage, while unnecessary work adds time without improving the result. In Colorado Springs, intense sun and temperature swings can put extra stress on exterior finishes, making a sound foundation especially important.
This guide explains how to assess common surfaces, choose a preparation sequence, and decide when primer belongs in the process. You’ll see how preparation changes for different materials and paint conditions, and how a careful workflow creates a clean, stable base for the finish.
Key Takeaways
- Professional surface preparation painting starts with identifying the surface, its existing coating, and signs of damage before choosing a method.
- Match the action to the condition: clean contaminants, scrape loose paint, and sand suitable irregularities to create a sound base.
- Check exterior surfaces for weathering before painting; Colorado Springs sun and UV exposure make careful assessment especially important.
- A well-planned workflow protects the area, inspects and prepares the surface, then readies it for primer or paint.
- Professional painters tailor preparation to the surface and project instead of relying on a one-size-fits-all checklist.
What Professional Surface Preparation for Painting Actually Does
Professional surface preparation is the process of assessing and conditioning a surface so primer or paint can form a suitable, even finish. It happens before paint application. The right steps depend on the material, the existing coating, and the condition of both.
Paint is more than color on a wall or trim. It’s a coating applied to a surface, as the general overview of Paint describes. For that coating to perform as intended, it needs a sound base. Dust, grease, chalky residue, and loose paint can interfere with adhesion, leading to peeling, patchy coverage, or uneven wear.
Preparation affects appearance, too. A fresh coat won’t automatically hide dents, rough patches, raised edges, or other flaws. In some lighting, it can make them more noticeable. Painting over dirt or failing paint may cover the problem briefly, but it doesn’t address the cause. Careful preparation creates a cleaner foundation, though it can’t resolve every source of damage or ongoing moisture by itself.
Why paint needs a clean, stable surface
Think of a painted surface as a layered finish. If the layer beneath is dusty, greasy, powdery from chalking, or already lifting, the new coating may bond to that unstable material instead of the surface itself. Cleaning removes contaminants; loose coatings need to be addressed before repainting.
Preparation can also reveal defects that need attention before coating begins. The goal isn’t to make every surface perfectly new. It’s to identify what could compromise the finish and address what’s appropriate for the project.
What professional preparation includes
Professional preparation follows a reasoned sequence, not an automatic checklist. Painters inspect the substrate and existing coating, clean away contaminants, correct suitable surface irregularities, and select primer based on the surface and project. Sanding can help with certain rough areas or coating transitions, but not every surface calls for it.
- Inspect: Identify the material, coating condition, and visible defects.
- Clean: Remove dirt or residue that could interfere with adhesion.
- Correct: Address loose coatings and suitable surface imperfections.
- Prime: Prepare the surface for the paint system selected for the job.
These steps prepare the surface; they aren’t the final paint application. Primer and finish coats have separate roles, and the right sequence varies with the existing surface and its condition. A thoughtful professional surface preparation painting process helps create a consistent finish on a stable foundation, rather than relying on another coat to conceal problems underneath.
How to Inspect a Surface Before Choosing Painting Preparation
Before choosing a preparation method, consider the material, the existing coating, and the condition of both. Painted wood trim, a masonry exterior, and a textured interior wall won’t necessarily need the same treatment. Even two areas made from the same material can call for different steps if one is sound and the other is peeling or weathered.
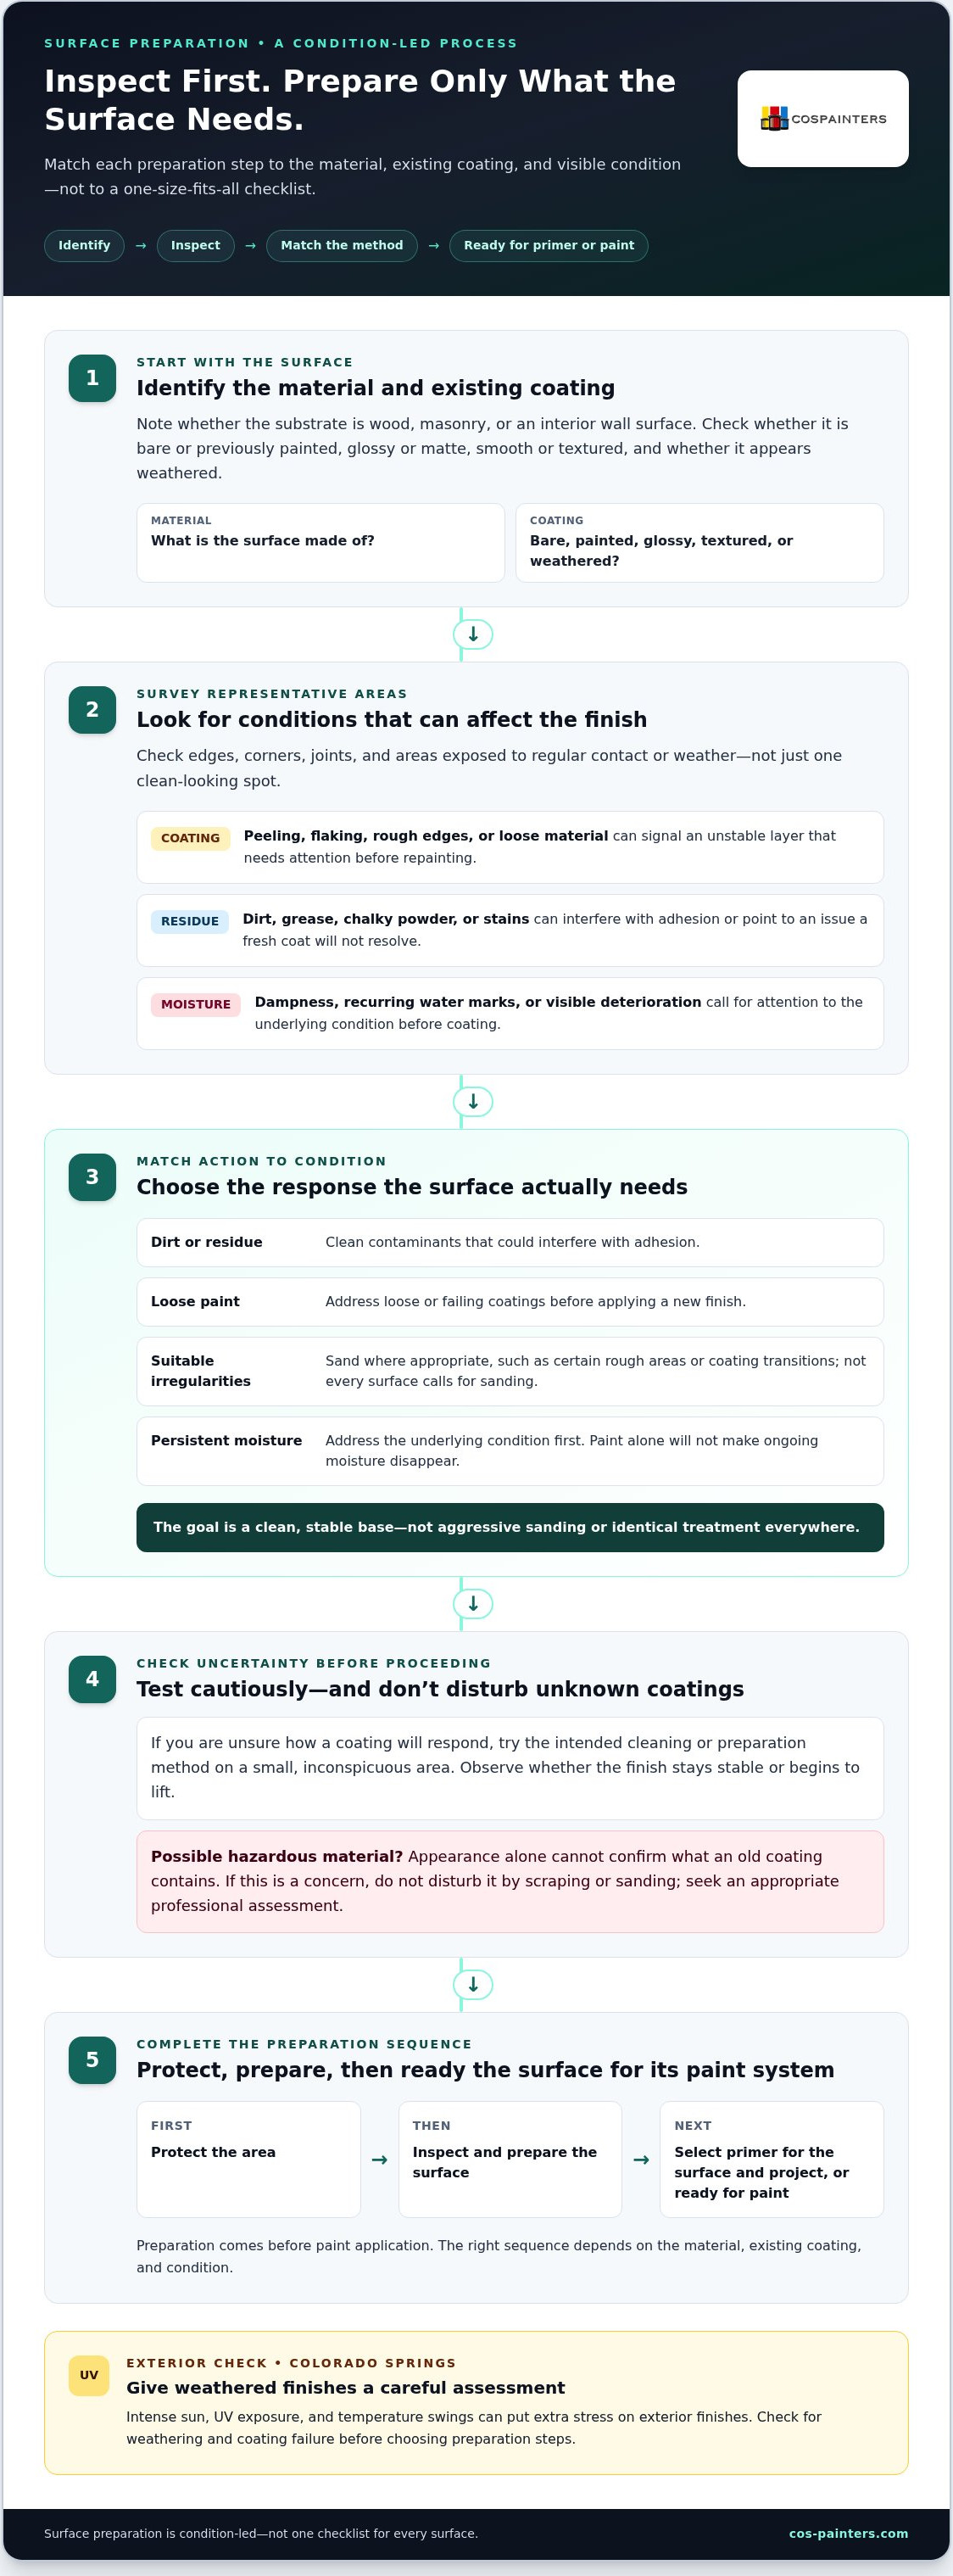
Before painting preparation begins, identify the surface and existing coating, then check for peeling, chalking, stains, moisture, and loose or damaged material. This initial survey helps you identify what needs attention and where a closer assessment is needed.
Identify the substrate and existing coating
Start by identifying the substrate, such as wood, masonry, or an interior wall surface. Note whether it’s bare or previously painted, glossy or matte, smooth or textured, and whether it appears weathered. These clues help determine how to prepare without assuming every area needs aggressive sanding or the same primer.
The existing coating matters as much as the material underneath. A sound, well-bonded finish may need a different approach from paint that’s flaking or powdery. If you’re unsure how a coating will respond, try the intended cleaning or preparation method on a small, inconspicuous area. Observe whether the finish stays stable or begins to lift. A test can guide the next step, but it can’t identify the contents of an unknown coating.
Recognize conditions that need attention
Inspect representative areas rather than judging the whole surface from one clean-looking spot. Check edges, corners, joints, and areas exposed to regular contact or weather. Look for peeling, flaking, rough paint edges, powdery residue, stains, and places where material feels or looks loose. Chalking may leave a powder-like film, while a stain can point to a problem a fresh coat alone won’t resolve.
Moisture deserves particular care. If a surface stays damp, shows recurring water marks, or has visible deterioration, address the underlying condition before coating; paint won’t make persistent moisture disappear. Also, don’t treat a visual inspection as a diagnosis. The appearance of old paint can’t confirm whether it contains hazardous material. If that’s a concern, don’t disturb it through scraping or sanding; seek an appropriate professional assessment first.
- Material: What is the surface made of?
- Coating: Is it bare, previously painted, glossy, textured, or weathered?
- Condition: Where are the loose areas, residue, stains, or signs of moisture?
This assessment is the starting point for professional surface preparation painting: choose actions based on observed conditions, not habit. For Colorado Springs homes and businesses, a careful review helps shape an interior or exterior painting project around the surface that’s actually there.
Which Preparation Method Fits the Surface and Its Condition?
Choose preparation based on what you found during inspection. Dirt calls for cleaning; paint that’s lifting needs loose material removed; and an uneven edge may benefit from careful sanding if the substrate and coating can tolerate it. These actions solve different problems, so one isn’t a substitute for another.
The comparison below is a starting point, not a universal recipe. A professional surface preparation painting plan considers both the material and coating condition before selecting a method.
| Condition | Preparation action | Intended result |
|---|---|---|
| Dust, grease, or surface grime | Clean with a method suitable for the material, then allow it to dry | Remove contaminants that can interfere with the next coating |
| Peeling or flaking paint | Carefully scrape away loose coating | Leave a more stable edge and remove paint that can’t support a new layer |
| Rough transitions or minor irregularities | Sand only where appropriate, then remove the resulting dust | Reduce uneven edges and create a smoother base |
| Small, suitable surface defects | Use an appropriate filling or patching approach | Improve the local surface without hiding a deeper issue |
| Bare, repaired, or unevenly absorbent areas | Consider a primer suited to the surface and coating plan | Support adhesion or help create a more uniform base |
Cleaning, scraping, and sanding are not interchangeable
Cleaning removes contaminants; it won’t secure paint that’s already loose. Scraping targets coating that has lost its bond, but it doesn’t smooth every edge. Sanding can soften suitable rough spots or transitions, yet aggressive abrasion may damage some substrates or coatings. The order depends on the job. After scraping or sanding, clean away residue before moving to the next step. Control dust, protect nearby areas, and use suitable protective equipment. Don’t dry-sand material that may be hazardous.
When repair or primer may be needed
Minor imperfections may be suitable for filling or patching before paint, followed by preparation appropriate to the repair. A patch isn’t a fix for persistent moisture, extensive deterioration, or a defect that’s still changing. Primer is selective, not a shortcut around cleaning or sound repairs. Depending on the surface, it may support adhesion or even out differences between bare and previously coated areas. Choose primer for the specific substrate and coating plan.
After the chosen steps, check that the surface is clean, stable, and ready for coating. Tailoring preparation this way is part of careful interior and exterior painting, not an extra step applied by default.
How Colorado Springs Conditions Affect Exterior Paint Preparation
Exterior preparation in Colorado Springs starts with checking how each part of the building has weathered. High-altitude sun and UV exposure can contribute to fading, chalky residue, and coating wear, while temperature changes and precipitation can affect whether a surface is ready to paint. Local conditions don’t call for one automatic preparation recipe. They make a careful, surface-by-surface inspection especially useful.
Check exposed areas before choosing how to clean, scrape, or sand. Preparation that suits a sheltered section may not be enough for a wall or trim facing stronger sun and weather. This is where professional surface preparation painting means adapting the work to what the coating and substrate show instead of assuming all sides of a home have aged alike.
Account for sun, exposure, and existing wear
Walk around the exterior and compare areas with different exposure. A sunny wall may look faded or feel chalky, while a shaded section could retain its color but show other signs of wear. Inspect trim, edges, and places where rain or snow may collect, too. These observations help identify where cleaning or removal of loose coating may be needed before applying a new finish.
Exposure can contribute to deterioration, but altitude or sun alone can’t predict how long a particular coating will last. Material, existing paint condition, maintenance, and weather all matter. A broader look at Colorado Springs exterior painting and home protection can put surface preparation in the context of caring for the whole exterior.
Choose suitable conditions for exterior preparation
Weather affects preparation as well as paint application. Before work begins, assess whether the surface is damp from rain, snow, washing, or lingering moisture. A coating applied before the surface is suitably dry may not perform as intended. Temperature and precipitation matter, too, so follow the selected coating manufacturer’s instructions for acceptable conditions, application, and drying. Don’t rely on a comfortable air temperature alone; the surface itself needs to be ready for the work.
Plan the sequence around actual conditions rather than a fixed calendar. If the weather changes, pause and reassess before coating. For interior areas where moisture is a regular consideration, such as bathrooms, preparation details differ from those for an exposed exterior. Professional bathroom painting takes the room’s surface conditions into account.
Colorado Springs homeowners can benefit from a tailored assessment before exterior work begins. Plan your exterior painting project around the surface’s exposure, current condition, and suitable working weather.
What a Professional Painting Preparation Workflow Looks Like
A reliable preparation workflow turns inspection into an organized plan. The sequence may shift depending on the surface, existing coating, and project conditions, but the goal stays consistent: protect surrounding areas, prepare the substrate, and confirm it’s ready for the next coating step. Professional surface preparation painting isn’t a fixed checklist; it’s a careful process shaped by what the surface needs.
From inspection to a paint-ready surface
Work begins by protecting nearby finishes, furnishings, landscaping, or fixtures as appropriate, then organizing the area so preparation can proceed neatly. After inspection, the plan identifies which surfaces need cleaning, coating removal, minor correction, or primer. Different areas may need different steps. Before application, the surface should be clean, dry, stable, and prepared according to the selected coating’s instructions.
- Protect: Cover or shield adjacent areas that shouldn’t receive dust, cleaning residue, or paint.
- Inspect: Review the substrate and existing finish, noting trouble spots and differences across the work area.
- Clean: Remove surface contaminants with a method suited to the material, then allow adequate drying.
- Address suitable defects: Remove loose coating and handle minor imperfections with an appropriate method.
- Prepare for coating: Remove remaining dust and follow the coating instructions for any additional preparation or primer.
These steps aren’t always strictly linear. After scraping or sanding, for example, a painter may need to clean away residue and inspect the surface again before moving forward. If cleaning exposes a loose edge or hidden defect, adjust the plan rather than applying the next coating over an unresolved condition. Keeping tools and materials organized also helps protect prepared sections from dust or accidental contact as work progresses.
When professional preparation can help
Professional guidance can be especially useful when a surface is extensively weathered, has several coating conditions, or includes details that are difficult to prepare consistently. A well-planned painting workflow matches preparation to the material and project, helping avoid unnecessary abrasion as well as missed problem areas. It also brings structure to work across multiple rooms or exterior sections, where needs can vary from one area to another.
Before coating, a final review checks that the surface is clean, dry, stable, and suitable for the next step. Dust left behind, dampness, or paint that still lifts can undermine an otherwise careful process, so readiness matters as much as the earlier preparation. The coating manufacturer’s guidance should inform final requirements, including whether primer is appropriate and what conditions are suitable for application.
For an interior or exterior project in Colorado Springs, Colorado Springs Painters brings careful preparation into its painting work, tailoring the process to the surface and project. Explore professional painting services to see how a considered workflow can support a clean, well-finished result.
Give Your Next Paint Project a Strong Start
A fresh finish can change how a room or exterior feels, but the choices made before painting shape the result. Consider what you want the space to look and feel like, then make sure the work begins with a surface ready for that transformation. That’s the practical value of professional surface preparation painting.
If you’re planning a home or business painting project in Colorado Springs, a locally owned and operated team can bring attentive local care to the process. Colorado Springs Painters approaches interior and exterior painting with preparation tailored to the surface and project, making the path from assessment to finished space clear and considered.
Ready to take the next step? Explore professional painting services and start planning a finish for your space with Colorado Springs Painters.
Frequently Asked Questions
Is surface preparation necessary before every painting project?
Yes, every project benefits from an assessment, but the amount of work can vary. A clean, sound wall may need little more than light cleaning, while trim with worn edges may need additional attention. A professional surface preparation painting plan helps distinguish those needs before work begins. Even a surface that looks fine from across the room can have dust, residue, or small areas of poor adhesion that affect the new finish.
Can you paint over an existing coat without sanding?
Often, yes, if the existing paint is clean, stable, and compatible with the new coating. Sanding isn’t automatically required for every repaint. A glossy finish, however, may need appropriate surface dulling or another preparation step to help the next coat adhere. Follow the coating manufacturer’s guidance, and don’t paint over paint that’s lifting or powdery. If the old coating may contain hazardous material, avoid disturbing it and seek an appropriate assessment.
How do you prepare a previously painted wall for fresh paint?
Start by moving or covering nearby items, then remove dust and clean fingerprints, splashes, or greasy marks with a method suitable for the wall finish. Let the wall dry fully. Small dings may need a suitable filler, followed by smoothing and removal of sanding dust. Spot-prime repairs or stains if the selected paint system calls for it. A whole-wall primer coat isn’t automatically needed for every repaint.
What happens if you paint over peeling or chalky paint?
The new coating may attach to the loose or powdery layer rather than a stable surface. As that underlying material releases, the fresh paint can flake, peel, or look uneven. A simple check is whether residue transfers onto a clean hand or cloth, though that observation alone doesn’t identify the coating or explain why it’s failing. Don’t disturb older paint that may be hazardous; get an appropriate assessment before scraping or sanding.
Does exterior paint preparation differ in Colorado Springs?
It can. Colorado Springs exterior surfaces experience strong sun and UV exposure, so inspect sunny elevations and sheltered sides separately for fading, chalking, and wear. Weather also affects readiness: a wall that’s damp after washing or precipitation isn’t ready just because the air feels dry. Check the surface itself and follow the coating manufacturer’s temperature and application guidance before exterior work proceeds.
Should primer be applied after surface preparation?
Not always. Primer may be appropriate on bare material, repaired spots, or surfaces where a more uniform base or added adhesion is needed. A previously painted surface in sound condition may not require a full primer coat, depending on the coating plan. Choose primer for the specific substrate and intended finish, and follow its directions. Primer won’t make a dirty, damp, or unstable surface ready by itself.
How long should a surface dry after cleaning before painting?
There isn’t one drying time that fits every surface. It depends on the material, how it was cleaned, how much moisture it absorbed, and the surrounding conditions. Wait until the surface is fully dry, including seams, textured areas, and other spots where water can linger. For exterior work in Colorado Springs, reassess after washing or precipitation, then follow the selected coating manufacturer’s instructions before applying primer or paint.


