

What if the best way to paint a textured wall isn’t to cover up its character, but to work with it? Painting over textured walls can feel tricky when paint skips crevices or leaves a patchy finish. Unlike a smooth surface, texture affects how paint reaches the wall and how evenly it covers.
Those concerns are understandable. A careful process can help you achieve more even coverage while keeping the existing texture intact. Paint can refresh the color, but it won’t smooth out the wall.
This guide walks you through preparing, priming, and painting textured walls in a practical order. You’ll find tips for choosing a roller, applying paint to peaks and valleys, and checking the finish before deciding whether another coat is needed. You’ll also learn what to look for before you start and when professional interior painting may make a project easier to manage.
Whether you’re refreshing one room or planning a larger update in Colorado Springs, match each step to the wall’s condition and texture. Thoughtful preparation and steady application can give the room a clean new look without losing the detail that makes the walls distinctive.
Key Takeaways
- Set expectations before you begin: paint can refresh color, but it won’t reliably smooth pronounced texture.
- For painting over textured walls, match the roller nap to the surface depth and follow the roller and paint labels.
- Use an evenly loaded roller and test a small area to see how paint reaches the wall’s raised areas and recesses.
- Inspect the finish after it dries. Coverage needs can vary with the surface and starting color, so don’t assume a fixed coat count.
- Consider professional interior painting for high walls, extensive repairs, or finishes that are difficult to match.
Painting Over Textured Walls: What to Expect Before You Start
Repainting a textured wall means applying a new coating over an existing raised or patterned surface while leaving its profile in place. The goal is refreshed color and more even-looking coverage, not a newly smooth wall. Repainting changes the wall’s color; resurfacing changes the wall itself.
That distinction helps set expectations before you buy supplies or begin preparing. Ordinary interior paint follows the surface contours, covering raised areas and entering recesses. Deep texture will therefore remain visible after painting. A buildup of paint may soften some fine details, but the result is difficult to predict. Smoothing pronounced texture is a separate surface-alteration project, not a normal painting step.
The texture’s depth, the wall’s condition, and the existing coating all affect the work ahead. A shallow pattern on a sound, clean wall calls for different preparation and application than deep texture with loose paint, stains, or dents. If you’re unsure what material sits beneath the finish, Understanding Plaster in Textured Walls offers general background on plaster and its uses in building and decoration.
Will painting over textured walls hide or change the texture?
In most cases, the pattern will still show through the new paint. A heavier application may soften fine details, but piling on paint to flatten raised areas can leave uneven buildup and still won’t reliably level the surface. If you want a smooth finish, plan for a separate approach to changing the wall rather than expecting paint to do that work.
Check the wall texture and condition first
Look closely in good light before choosing your application approach. Orange peel and knockdown are common examples of textured finishes, but patterns and depth vary. Note where the texture is most pronounced and whether any areas look or feel different from the rest.
Check for loose or peeling paint, stains, dust, dents, and damaged spots that may need attention before coating. Dust and residue can interfere with adhesion and consistent coverage, while existing paint in poor condition can affect the appearance of the new finish. Identify whether each mark is surface dirt, a stain, or damage so you can prepare for the specific issue.
- Loose paint: Note where the coating is lifting or flaking.
- Stains: Check whether discoloration is isolated or spread across the wall.
- Dust and residue: Look along ledges, corners, and textured recesses where particles can collect.
- Dents or damaged areas: Mark spots that may need repair before painting.
Before committing to the whole room, apply paint to a small, inconspicuous test area. Let it dry according to the paint label, then assess the coverage and how the texture looks under the room’s usual lighting. A test patch shows how the surface responds and can reveal preparation concerns before you repeat the process across every wall.
Prepare Textured Walls for Paint Without Flattening the Finish
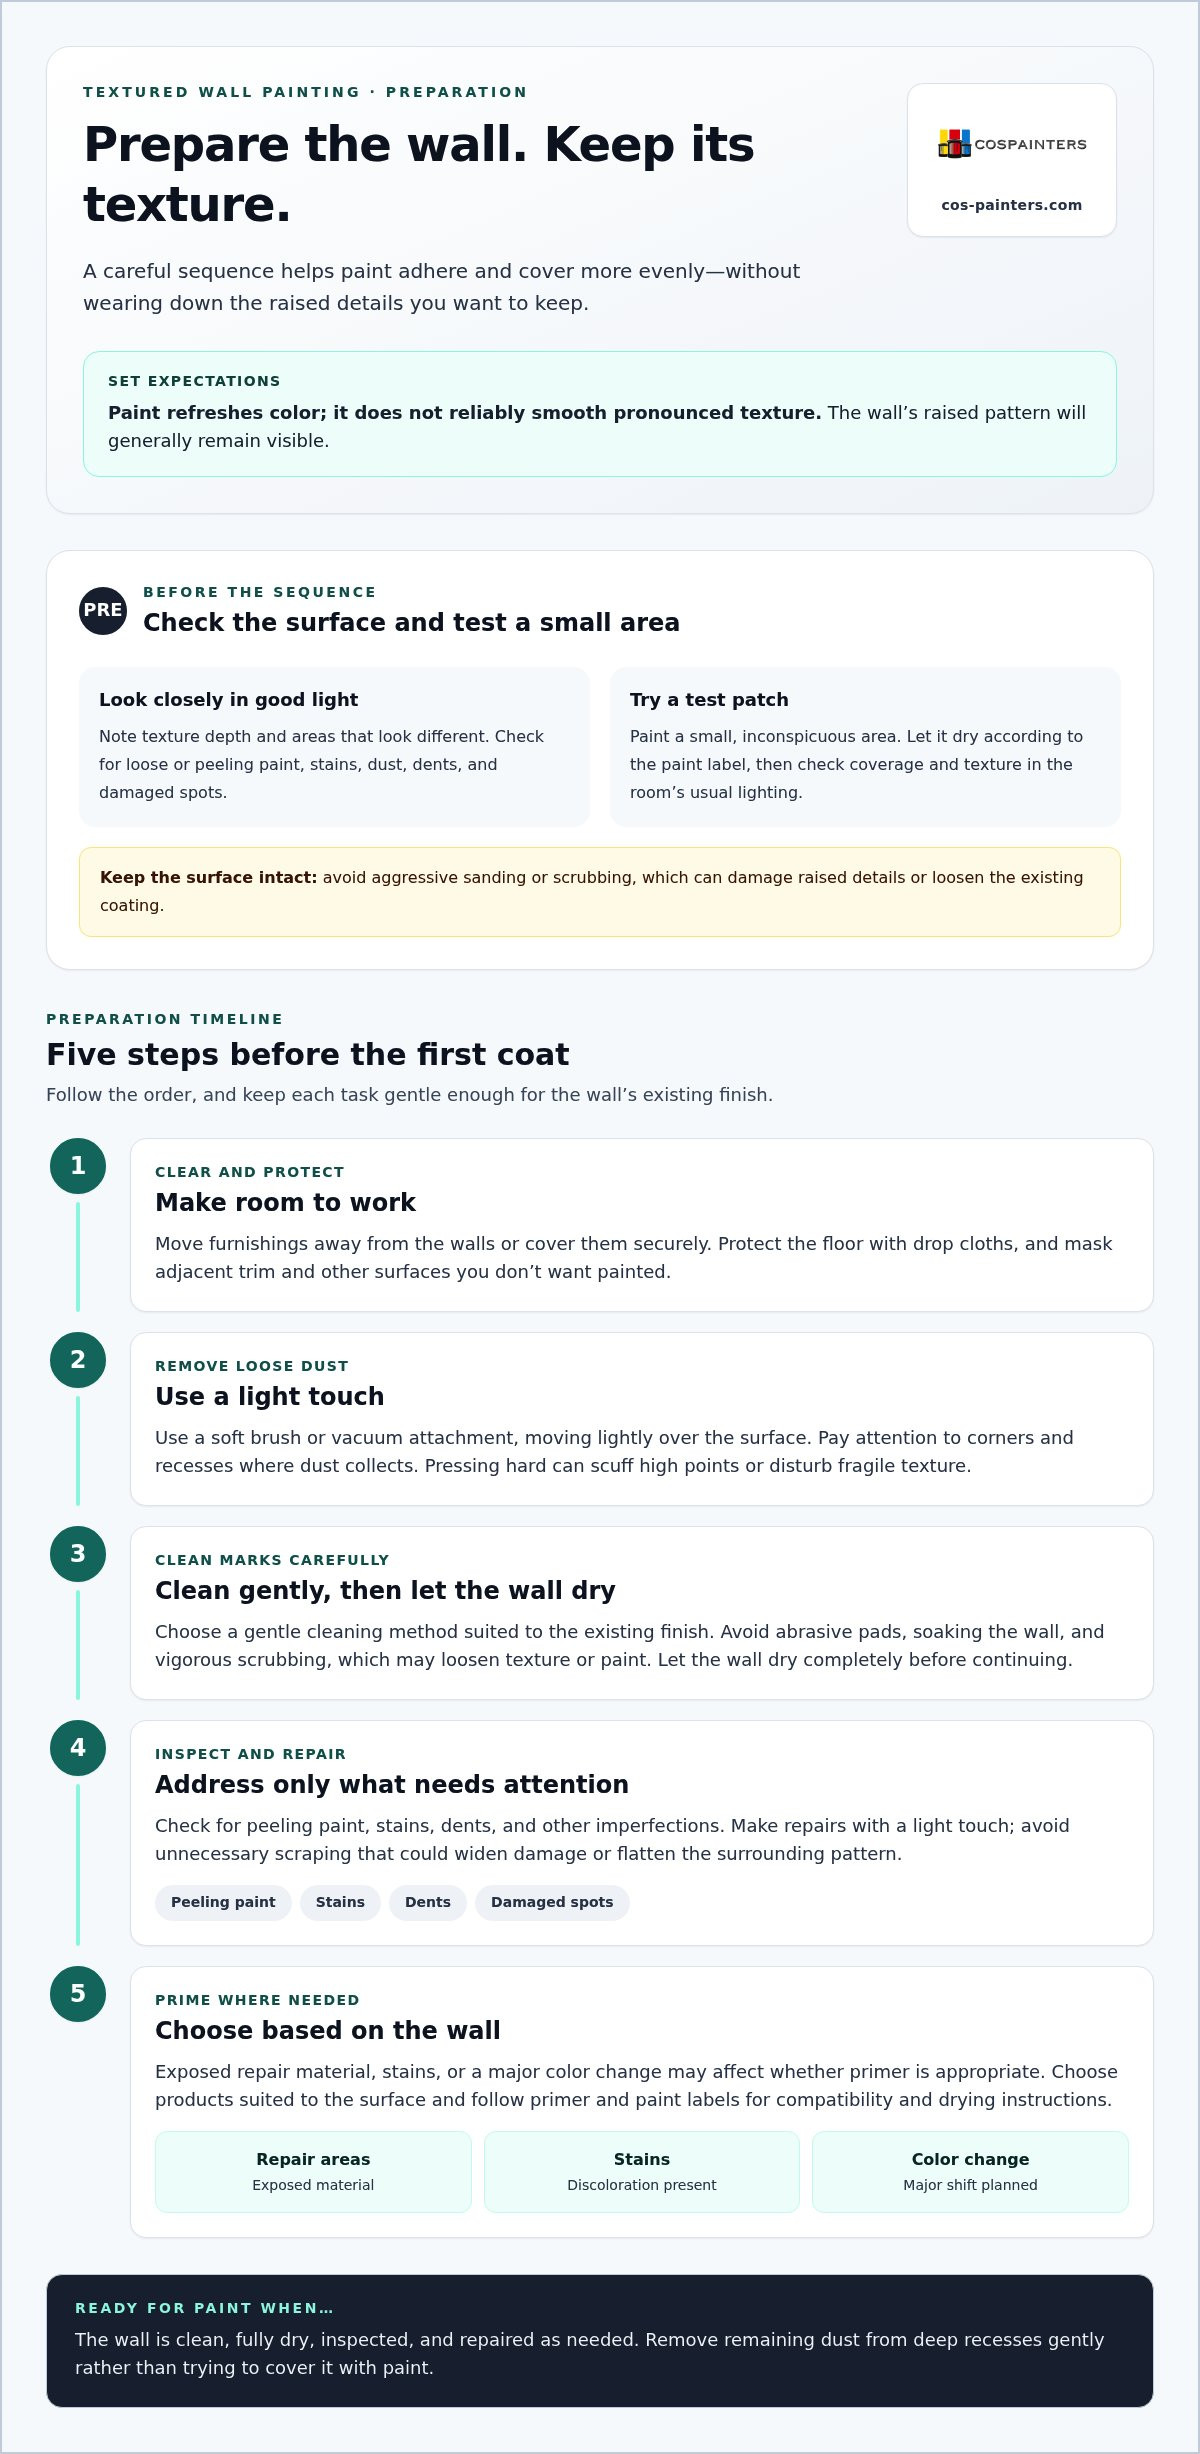
Good preparation helps paint adhere evenly without wearing down the texture you want to keep. Work in sequence: clear the room, protect nearby surfaces, clean the wall, inspect it, make needed repairs, and prime where appropriate. Avoid aggressive sanding or scrubbing, which can damage raised details or loosen the existing coating.
- Clear and protect the room. Move furnishings away from the walls or cover them securely. Protect the floor with drop cloths, and mask adjacent trim and other surfaces you don’t want painted.
- Remove loose dust gently. Use a soft brush or vacuum attachment, moving lightly over the surface. Pressing hard can scuff high points or disturb fragile texture. Pay attention to corners and recesses where dust tends to collect.
- Clean marks carefully. Use a gentle cleaning method suited to the existing finish, and avoid abrasive pads or soaking the wall. Too much moisture or vigorous scrubbing may loosen the texture or paint. Let the wall dry completely before moving on.
- Inspect and repair. Look for peeling paint, stains, dents, and other imperfections. Make repairs with a light touch, avoiding unnecessary scraping that could widen damage or flatten the surrounding pattern.
- Prime where needed. Bare repair areas, stains, or a major color change may affect whether primer is appropriate. Choose products suited to the surface and follow the primer and paint labels for compatibility and drying instructions.
Clean, protect, and inspect the textured surface
Cleaning is more than a cosmetic step. Dust and residue can create a barrier between the wall and its new coating, contributing to inconsistent adhesion or coverage. After cleaning, check the surface in good light and from different angles. If dust remains in deep recesses, remove it gently before painting rather than trying to cover it with a coat.
Repair imperfections and decide whether primer is needed
Keep repairs limited to what the wall needs. For a small dent or damaged spot, use a careful, texture-conscious approach so the repair doesn’t spread across intact areas. Primer decisions depend on the surface: exposed repair material, stains, and a strong color change can all affect the result. Follow product labels, and allow cleaned or repaired areas to dry fully before coating.
Preparation principles apply across many wall types, but textured surfaces call for extra care around raised details and recesses. The professional surface preparation guide offers a broader look at getting surfaces ready for paint. For a project that includes professional assessment, preparation, and application, professional interior painting in Colorado Springs brings those steps together.
Choose a Roller and Application Method for the Texture
The right roller should reach the wall’s recesses without flooding its raised areas. Texture depth matters more than choosing a roller by habit, and the paint’s instructions matter too. When painting over textured walls, test your roller and technique on a small area before moving on to a full wall.
Tool rule: the deeper the texture, the more reach the roller nap needs, guided by the roller and paint labels. A small test patch helps you check coverage and splatter before painting a larger area.
How do you choose a roller nap for textured walls?
A longer nap can reach farther into a deep surface profile, while a shorter nap may suit a wall with light texture. As a general reference, roller guidance often places lightly textured walls in the 3/8- to 1/2-inch nap range, with heavier textures needing a longer nap. These aren’t universal prescriptions: check the roller and paint labels, then test an inconspicuous spot. If recesses stay bare or paint splatters excessively, adjust your approach before continuing.
Roll and cut in for consistent coverage
Start by brushing paint carefully into corners and along trim, without leaving thick lines at the edges. Then roll the nearby area while that paint is still wet, blending the two for a more consistent finish. Work in manageable sections and keep a wet edge as you move across the wall. Overlap each pass slightly, and use steady pressure rather than pressing hard enough to drag or crush the texture.
Even loading helps prevent two common problems: dry roller patches that miss recesses and excess paint that collects on raised areas. Dip the roller into the paint, then distribute it across the ridges of the tray until the cover is evenly coated and not dripping. Reload as needed rather than trying to stretch a nearly dry roller across a large area.
- Cut in a manageable section. Brush around corners and trim, covering only an area you can roll before the edge dries.
- Load and distribute paint. Roll through the tray ridges so paint is spread consistently across the cover.
- Apply with controlled passes. Roll in overlapping strokes with light, even pressure. Change direction as needed to help reach textured recesses, but avoid repeatedly working paint that is beginning to dry.
- Blend as you go. Roll close to brushed edges and into the next section while the paint is still wet. Step back periodically to spot thin areas, drips, or uneven buildup in the room’s lighting.
Technique may need small adjustments as the wall changes. A smoother patch beside deeper texture, for example, may take paint differently. Watch the roller’s coverage and maintain an even load rather than applying extra pressure. If the surface or room makes controlled application difficult, professional interior painting in Colorado Springs can help with careful assessment and consistent application.
Paint Textured Walls Step by Step and Check the Finish
Once the wall is prepared and your tools are ready, work in a steady sequence. Stir the paint thoroughly, apply it without overworking the texture, then let the coat dry as directed before judging coverage. The final appearance depends on the starting color, the wall’s texture and condition, and the paint itself, so don’t assume every project needs the same number of coats.
Apply the first coat without overworking the texture
Before rolling, stir the paint according to its label. Load the roller evenly, then use the tray to remove excess so it won’t drip or leave heavy deposits on raised areas. Apply controlled, slightly overlapping passes across a manageable section. If you notice a lightly missed spot while the paint is still workable, touch it up gently. Avoid repeated, forceful rolling, which can disturb the texture or leave excess paint behind.
- Stir and prepare. Mix the paint as directed and pour a workable amount into a roller tray. Keep the container covered when you’re not pouring.
- Start at an edge. Work near a corner or cut-in area, blending the roller application into the brushed paint while both are still wet.
- Coat in sections. Roll with steady, overlapping passes, keeping a wet edge as you move across the wall. Reload when needed instead of stretching paint too thinly over a large area.
- Pause before judging. Let the coat dry for the time and conditions specified on the paint label. Wet paint can look different from the finished surface, so wait before deciding whether coverage is complete.
Inspect coverage and finish the next coat carefully
After the first coat has dried as directed, check the wall in good light from more than one angle. Look into recesses for thin or missed spots, and scan raised areas for drips, heavy buildup, or patches with a different sheen. If coverage looks uneven, decide whether another coat is needed rather than applying one automatically. Follow the paint label for recoating and drying guidance, and let each coat dry before inspecting it.
For a second coat, repeat the same measured process. Stir the paint, load the roller evenly, and work in manageable sections so adjoining passes blend cleanly. Focus on bringing coverage into recesses without saturating the high points. If you find a drip, address it according to the paint’s instructions rather than repeatedly rolling over a drying area. Once the finish is dry, remove masking carefully and clean brushes and rollers according to the product label.
Textured walls can reveal small inconsistencies that are easy to miss while you’re working. A careful final inspection helps you catch them before you put the room back together. For professional assessment and careful application, explore interior painting in Colorado Springs.
When Professional Textured-Wall Painting Makes Sense in Colorado Springs
Some textured-wall projects are manageable as a DIY refresh. Others involve more than careful rolling. Consider the room’s size, the condition of the existing finish, and whether you can safely reach every area and apply paint consistently. If the preparation or finish feels beyond your comfort level, professional interior painting can make the process easier to manage.
Signs a textured-wall project may need professional attention
Take a closer look before deciding how to proceed. Widespread peeling, persistent stains, uneven old repairs, or texture that appears loose can complicate painting over textured walls. These issues may need careful assessment before a new coat is applied. High ceilings and hard-to-reach walls can also make it difficult to work evenly and inspect the finish.
- Widespread peeling: Areas lifting across more than one small spot may need attention before painting.
- Persistent stains: Discoloration that remains after cleaning can affect preparation and the finished appearance.
- Uneven repairs: Mismatched patches may stand out more once the wall is freshly painted.
- Loose texture: If raised material seems unstable, avoid aggressive scraping or rolling over it without assessing the surface.
Room layout matters, too. A large, continuous space can make clean transitions and consistent coverage more demanding, especially if it includes tall walls, stairwells, or multiple connected areas. Professional help is a practical option when you’re unsure how to address the surface or preserve the look of its existing texture.
A coordinated painting workflow brings assessment, preparation, and application together. The surface is considered before work begins, problem areas are addressed as part of the plan, and application is handled with attention to consistent coverage. This approach can be useful when different wall sections have varying texture, repairs, or existing finishes. It gives homeowners a clear path from evaluating the room to completing the refresh, without treating every wall as though it were identical.
Plan an interior painting refresh with a local team
For homeowners in Colorado Springs, Colorado Springs Painters provides professional interior painting. Careful preparation and quality application help guide the work while keeping the existing finish in view. If you’re planning a broader home update, the Colorado Springs house-painter checklist offers related planning guidance.
You can handle a straightforward room at your own pace, or bring in a team when the surface, access, or scope feels challenging. If professional support is the right fit, explore interior painting services for your Colorado Springs home.
Plan a Refresh That Feels Right for Your Home
Before you begin painting over textured walls, think about how you want the room to feel when the work is done. A color that looks appealing on its own can look different beside your flooring, furnishings, trim, and the light that shifts through the space. Considering these elements together can help you choose a cohesive color rather than treating the walls as an isolated surface.
Then consider the project’s scale and the finish you’re comfortable managing. A room you can prepare and paint with care may be a satisfying DIY update. If the walls are challenging to reach or the existing finish raises concerns, professional support can help make the next step more straightforward.
For a carefully managed refresh in Colorado Springs, explore professional interior painting. Whether you take on the work yourself or bring in a local team, a thoughtful plan can help your room feel renewed and welcoming.
Frequently Asked Questions
Can you paint over textured wallpaper?
Yes, if the wallpaper is firmly attached and its surface can accept paint. Check seams, corners, bubbles, and peeling edges first, since paint won’t secure loose wallpaper and moisture from painting may make weak areas lift further. Use a primer labeled as compatible with the wallpaper material, especially if the surface is coated or vinyl-like. Test a discreet area and inspect it after it dries before continuing across the room.
Is it better to spray or roll paint on textured walls?
For most DIY projects, rolling offers more control and avoids managing overspray throughout the room. Spraying can apply paint quickly across a broad surface, but it requires careful masking and consistent technique to avoid thin spots or uneven buildup. For painting over textured walls, the best choice depends on the room, the texture, and your comfort with the tools. A small trial can help you judge whether your method reaches the surface evenly.
What paint finish works well on textured walls?
A matte or flat finish can make pronounced texture feel less noticeable because it reflects less light. Eggshell or satin may be easier to wipe in spaces that see frequent contact, but their added sheen can make bumps and surface variations more visible, especially with light falling across the wall from the side. Consider both cleaning needs and room lighting, then compare finish samples on the wall before choosing for your Colorado Springs home.
How long should I wait before applying another coat?
Follow the paint label’s recoat time, since it depends on the specific product and conditions during application. “Dry to the touch” doesn’t always mean the paint is ready for another coat. If the wall still feels tacky or looks wet in recesses, give it more time rather than rolling over it. Ventilation and room conditions can affect drying, so use the manufacturer’s instructions for the conditions in your home.
Can you paint a textured ceiling the same way as a wall?
The basic idea is similar, but a ceiling needs extra planning. Overhead work can tire your arms and make it harder to keep application even, while a roller may send droplets downward. Cover floors and furnishings thoroughly, use stable equipment, and avoid pressing into fragile texture. If using a sprayer, account for overspray on every nearby surface. For high or extensive ceilings, professional interior painting can help make the work more manageable.
Will a second coat make textured walls look smoother?
A second coat can improve color consistency or hide thin coverage, but it won’t reliably level the wall. Extra paint may soften fine details slightly, yet the amount of change varies with the texture and application. Check the first coat only after it has dried as directed, then look at the wall under different lighting. If you want a genuinely smoother profile, that requires changing the surface, not simply adding more paint.


