

You can often stay home during hardwood installation, but some rooms may be temporarily off-limits and the work can involve noise and disruption. A flooring installation process with minimal disruption starts with preparing the work area and planning how you’ll use your home while the crew works.
It’s natural to want to know what daily life will look like before installation begins. The project’s size, layout, flooring type, and installation method all affect access and timing. Some materials also need time before the floor is ready for regular foot traffic or furniture.
This guide covers four practical steps: preparing your home and coordinating other work, understanding the schedule and material acclimation, planning around installation and curing time, and caring for your new floor afterward. A clear plan helps the work move smoothly and sets expectations as each space is transformed.
Key Takeaways
- Clear furniture and belongings from the work area, and coordinate schedules with other trades to help installation proceed smoothly.
- Protect a new floor by limiting early foot traffic, following the material’s care instructions, and moving furniture carefully.
- Plan access around the floor type and installation method; phasing work can keep some areas usable while others are underway.
- Set realistic start and finish dates, allowing for material acclimation and any preparation the room needs before installation.
1. Preparing the work area and coordinating vendors
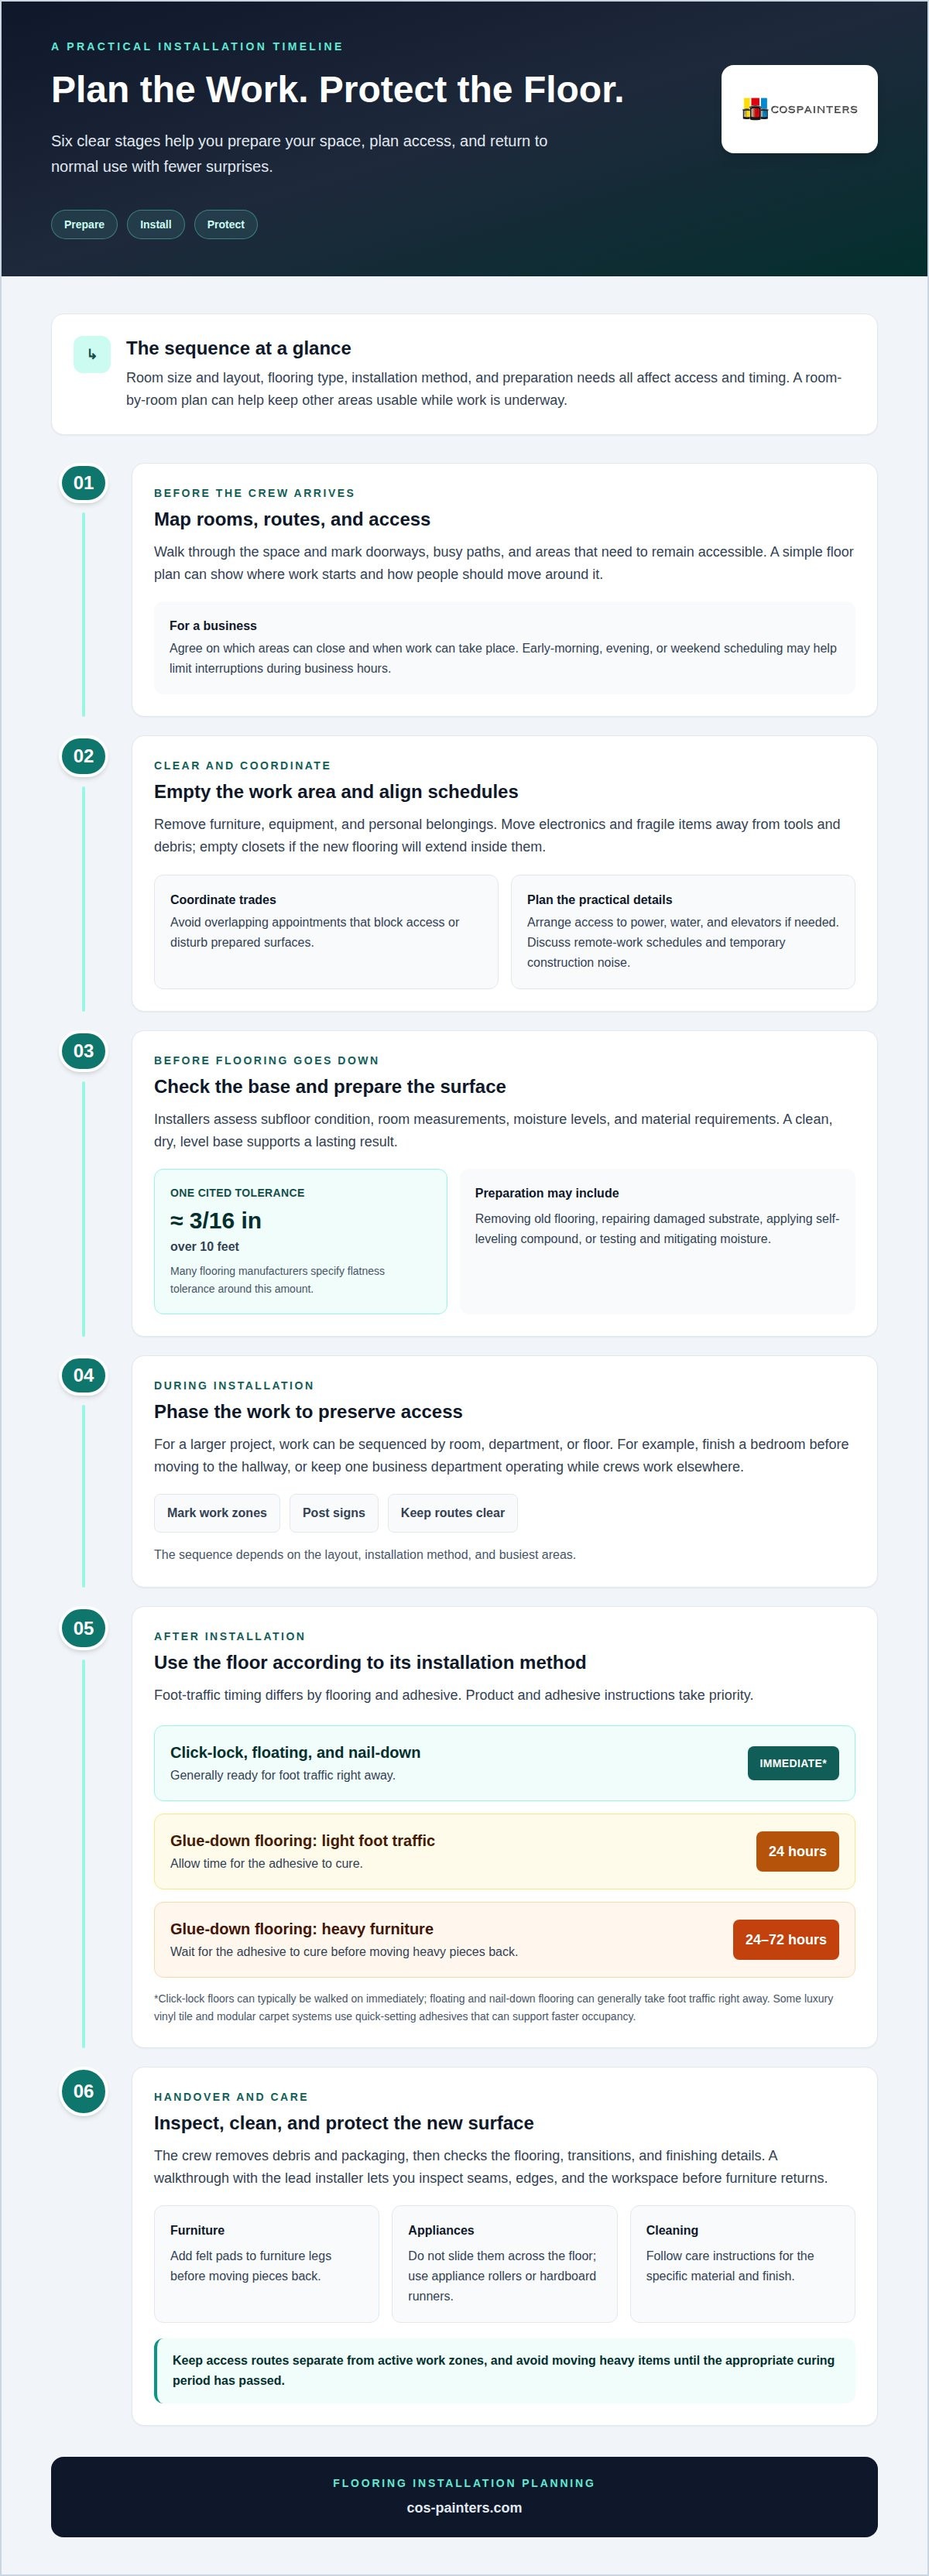
Planning a flooring installation process with minimal disruption starts with a room-by-room walkthrough. Note doorways, high-traffic paths, and spaces that must stay accessible. For a business, decide which areas can close and agree on work windows with the people affected. Early-morning, evening, or weekend scheduling may help limit interruptions during business hours. A simple floor plan can show the crew where work begins and how people should move around it.
Clear furniture, equipment, and personal belongings from the work area before installation begins. Move electronics and fragile items away from tools and debris. For example, empty a bedroom closet if the new hardwood or carpet will extend inside it. A clear room gives installers room to work and prevents delays caused by moving items mid-project. If you work remotely, discuss your schedule with the team and plan around temporary construction noise.
Before new flooring goes down, installers assess the subfloor’s condition, room measurements, moisture levels, and material requirements. A clean, dry, level base supports a lasting result. Many flooring manufacturers specify flatness tolerance at about 3/16 of an inch over ten feet. Preparation may include removing old flooring, repairing damaged substrate, applying self-leveling compound, or testing and mitigating moisture. These checks help identify surface issues before installation begins.
Coordinate other trades so their schedules don’t overlap with the flooring crew. A delivery or repair appointment that blocks access, for example, can slow progress or disturb the prepared surface. Arrange access to power outlets, water, and elevators if needed. Mark work zones, post signs, and tell employees which routes remain open. These steps help keep the flooring installation process with minimal disruption organized, from room preparation to crew access.
2. Post-installation traffic limits and cleaning
After installation, limit foot traffic until the flooring is ready for use. Some materials need time to settle, and adhesive needs time to cure. For glue-down flooring, light foot traffic is typically allowed after 24 hours. Heavy furniture should wait 24 to 72 hours for the adhesive to cure. Follow the product and adhesive instructions because the required timing depends on the materials used.
Professional flooring installation costs depend on the project, with a quote provided after a request. Factors include the flooring material, preparation needs, and the size and conditions of the space.
Protect the new surface as the room returns to use. Put felt pads on furniture legs before moving pieces back. Don’t slide appliances across the floor; use appliance rollers or hardboard runners. These precautions help prevent scratches and scuffs as furniture and equipment are repositioned. If an area still needs to stay clear, keep its access route separate from the active work zone.
Cleanup is part of the installation-day sequence. The crew removes debris and packaging, then checks the flooring, transitions, and finishing details. A walkthrough with the lead installer gives you a chance to inspect seams, edges, and the workspace before furniture is brought back. During the work, containment tools, plastic sheeting, and regular cleanup can help manage dust and debris.
Once the floor is in service, match cleaning to its material and finish. Luxury vinyl, for example, should be cared for according to its product instructions. Avoid moving heavy items until the appropriate curing period has passed. A clear cleanup plan helps the flooring project reach a tidy handover, while sensible traffic limits protect the new surface. For help planning flooring installation and the steps that follow, explore professional flooring installation.
3. When Can You Walk on an Installed Floor?
Click-lock floating floors can typically be walked on immediately after installation because they don’t rely on adhesive curing. Floating and nail-down flooring can also generally take foot traffic right away. By contrast, light traffic on glue-down flooring is typically allowed after 24 hours, subject to adhesive instructions. Some luxury vinyl tile and modular carpet systems use quick-setting adhesives, which can support faster occupancy.
For a smoother return to normal routines, phase larger projects by room, department, or floor. At home, installers can finish a bedroom before moving to the hallway, keeping other rooms accessible. A business may keep one department operating while crews work elsewhere, with signs directing people along an appropriate route. The sequence depends on the layout, installation method, and busiest areas.
Choose flooring by balancing appearance with daily use and room conditions. Consider household traffic, moisture exposure, and the look you want. In a commercial space, account for customer flow, equipment, cleaning routines, and durability needs. These factors help identify flooring that suits the space and limits unnecessary access restrictions during installation.
Can new flooring go over existing flooring? Sometimes, if the existing surface is sound and the new material’s requirements allow it. The installer assesses stability, moisture, surface condition, and changes in floor height that could affect doors or transitions. A damaged or uneven base may need preparation rather than covering.
Do flooring installations require permits or follow local building codes? Requirements depend on the project scope and applicable local rules. Replacing a surface is different from work that changes the underlying structure, so the details of the project matter.
During a consultation, share household schedules, access needs, and any rooms that must stay usable. Pets can remain in unaffected rooms, with temporary gates keeping them away from tools and open work zones. This planning helps fit installation phases around your household or business routine.
4. Project timeline and material acclimation
Set start and finish dates with the installer, then plan around each room’s access needs. The timeline depends on room size, flooring type, subfloor preparation, stairs, transitions, and installation method. Discuss how long each space will be unusable, including preparation and any time materials need before installation. An experienced installer can map out the stages so household routines or business operations have a clear schedule.
Wood flooring needs time to adjust to indoor conditions before installation. Acclimate it in the rooms where it will be installed, with the home at its normal living temperature and humidity. This gives the material time to adjust to its surroundings. Keep conditions steady during acclimation, and account for this step when setting the installation date.
Use these acclimation periods as planning guideposts for common flooring materials:
- Solid hardwood: 5-7 days before installation.
- Engineered wood: 48-72 hours before installation.
- Laminate: 48 hours before installation.
- Vinyl plank: 24-48 hours before installation.
- Tile products may have different preparation requirements, so confirm the selected product’s instructions before installation.
Commercial materials, including vinyl planks and carpet tiles, may also need 24-48 hours in the building before installation. Allowing for that time helps align delivery, preparation, and crew scheduling. Confirm the selected material’s requirements as part of the project plan, since acclimation needs vary by product.
How long does installation take? Small commercial offices or retail spaces take 1-3 days; facilities measuring 5,000-10,000 sq. ft. take 3-7 days. Large commercial projects can take 1-3 weeks or longer, often in stages. A hardwood project’s duration depends on its size and complexity, plus preparation, stairs, transitions, and method. For a schedule tailored to your flooring project, plan your flooring installation.
Colorado Springs Painters: Flooring
Colorado Springs Painters installs flooring in residential and commercial properties in Colorado Springs. If you’re planning a new floor and want to understand how the work may affect room access, the team can plan around your space, flooring choice, and preparation needs.
Share which rooms need new flooring, how you use them, and any access requirements that could affect the schedule. This helps create a practical installation plan, including the steps needed before the space returns to regular use. For a business, explain which areas need to stay operational; for a home, note household routines and rooms that are difficult to close off.
When you’re ready to discuss a flooring project, contact Colorado Springs Painters to talk through your plans.
Plan Your Flooring Project with Confidence
A new floor can shape how a room feels and functions well beyond installation day. Before scheduling work, consider how you use the space, from quiet rest to busy family routines or customer traffic. Thinking about daily use helps match the flooring choice to the way you want the room to work.
A flooring installation process with minimal disruption is also an opportunity to plan how your space will come together as a whole. Alongside flooring, Colorado Springs Painters offers interior and exterior painting, as well as commercial decorating, for other property improvement needs.
When you’re ready to discuss your flooring plans, contact Colorado Springs Painters. A thoughtful next step can bring your vision closer to a refreshed, welcoming space.
Frequently Asked Questions
Can You Stay in Your Home During Hardwood Installation?
Yes, staying home can work if you can use rooms outside the active work area. Keep daily essentials in an unaffected room, for example, and plan meals or work around temporary noise. A household with young children, pets, or limited alternative access may need a different arrangement. Discuss room access and routines before work begins so the installation sequence fits your household.
When Can You Walk on an Installed Floor?
It depends on the flooring and installation method. Site-finished hardwood typically needs 24 to 48 hours before light traffic in socks, and several days before foot traffic in shoes. Full hardness can take a few weeks. Follow the product and adhesive instructions for your floor, and keep footwear, pets, and wheeled items off surfaces until the stated traffic limits allow them.
What Happens with Subfloor Concerns?
Assess the subfloor before installing the new surface. If it is damaged or uneven, preparation may involve repairs or a self-leveling compound. Moisture testing can also identify conditions that may need mitigation. These findings can change the work sequence, so account for any required preparation before laying the flooring.
What are the steps in a flooring installation process?
A typical sequence moves from assessing the room and planning materials to clearing the work area, preparing the subfloor, and installing the flooring. The crew then completes transitions and finishing details, removes debris, and inspects the result. For example, stairs or several doorway transitions need to be included in the plan rather than treating the main floor as the only task.
How should homeowners prepare a room before flooring installation?
Remove small belongings, breakables, and items stored on the floor, then clear a path from the entrance to the work area. Empty closets if the new flooring will extend inside them. Arrange a safe place for pets away from tools and open work zones. If large furniture will stay in the room, plan how it will be moved so installers can reach each section.
How can dust, noise, and odors be minimized during flooring installation?
Containment tools, plastic sheeting, and regular cleanup can help manage dust during installation. Keep doors to unaffected rooms closed where practical, and avoid crossing the work zone. Plan calls, remote work, or quiet activities away from areas where tools are operating. If the flooring method or materials may produce noticeable odors, discuss room use and ventilation arrangements with the installation team before work starts.


